- Published on
I vibe coded a web agent - Part I
- Authors
- Name
- Pursue


Catalogue
- 1 Foreword
- 2 Architecture
- 3 How does it work
- 3.1 System prompt
- 3.2 Break down the complex task
- 3.3 Generate actions for each step
- 3.4 Perform actions for each step
- 3.5 Perform actions for each sub task
- 3.6 Completion verification(Optional)
- 4 Cost
- 5 Vibe coding feedback
- 6 Summary
- 7 Source code
1 Foreword
Lately, I have been experimenting with building a web agent through vibe coding. This article is the first part of a series where I will share my journey. You will know how to build a web agent and how feasible it is to build a web agent with vibe coding completely.
When I decided to experiment with vibe coding, I had no idea what I was going to build. I just wanted to try it out. After some time, I realized that building a web agent would be a good project to start with given my expertise in web development and my interest in AI areas.
Once the direction was set, I started to explore how to build a web agent through Google and came across with this amazing article. To be honest, I didn't watch the tutorial embedded in the article because the general idea of how to build a web agent is what I was looking for. It is well written and provides a clear understanding of the architecture and components needed to build a web agent, which is also the essentials I needed to vibe code with.
2 Architecture
The following architecture diagram is formed eventually after I vibe coded for dozens of hours with the idea from the article above:
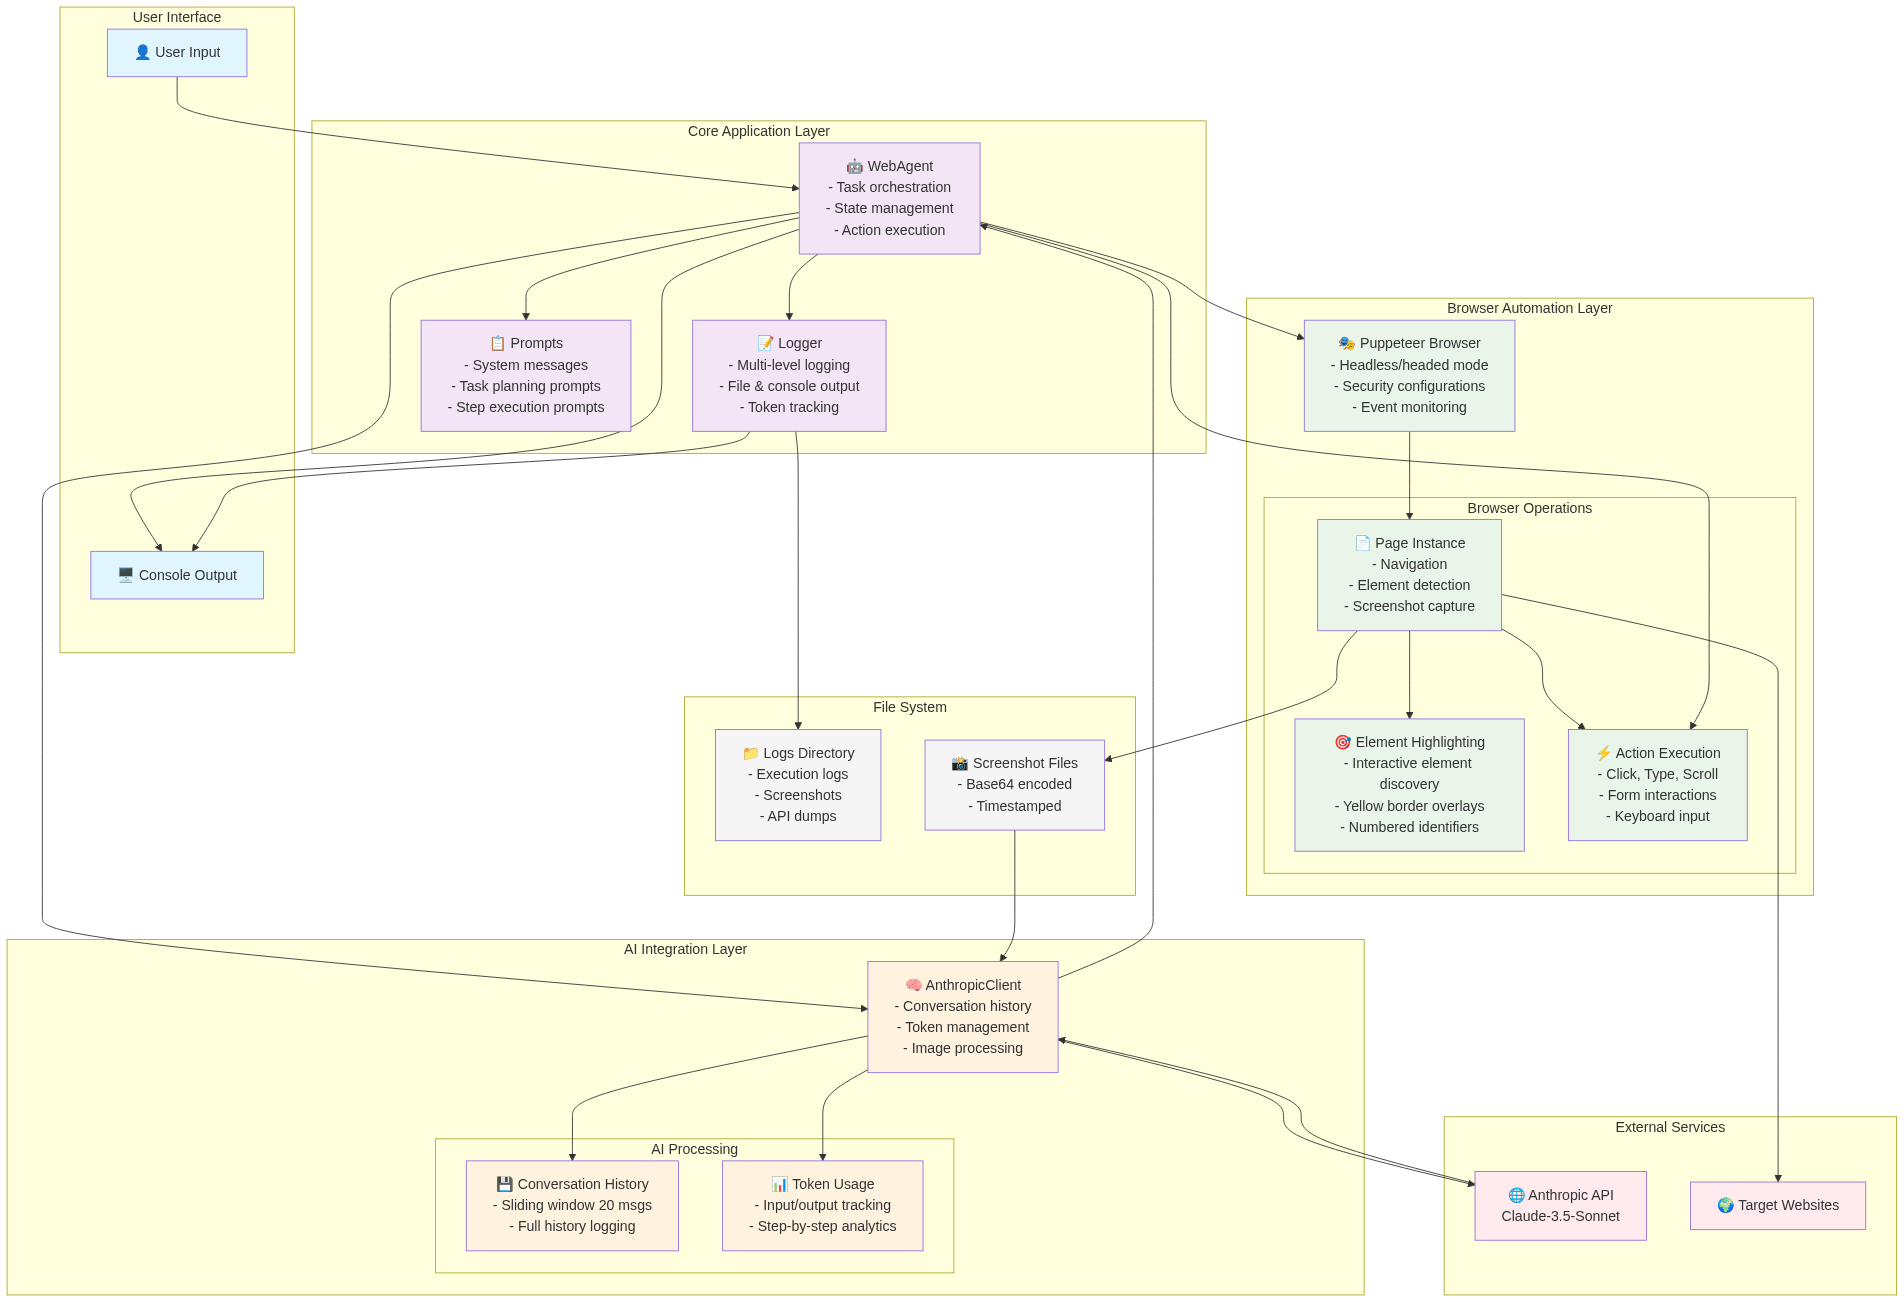
3 How does it work
The workflow of the web agent is as follows:
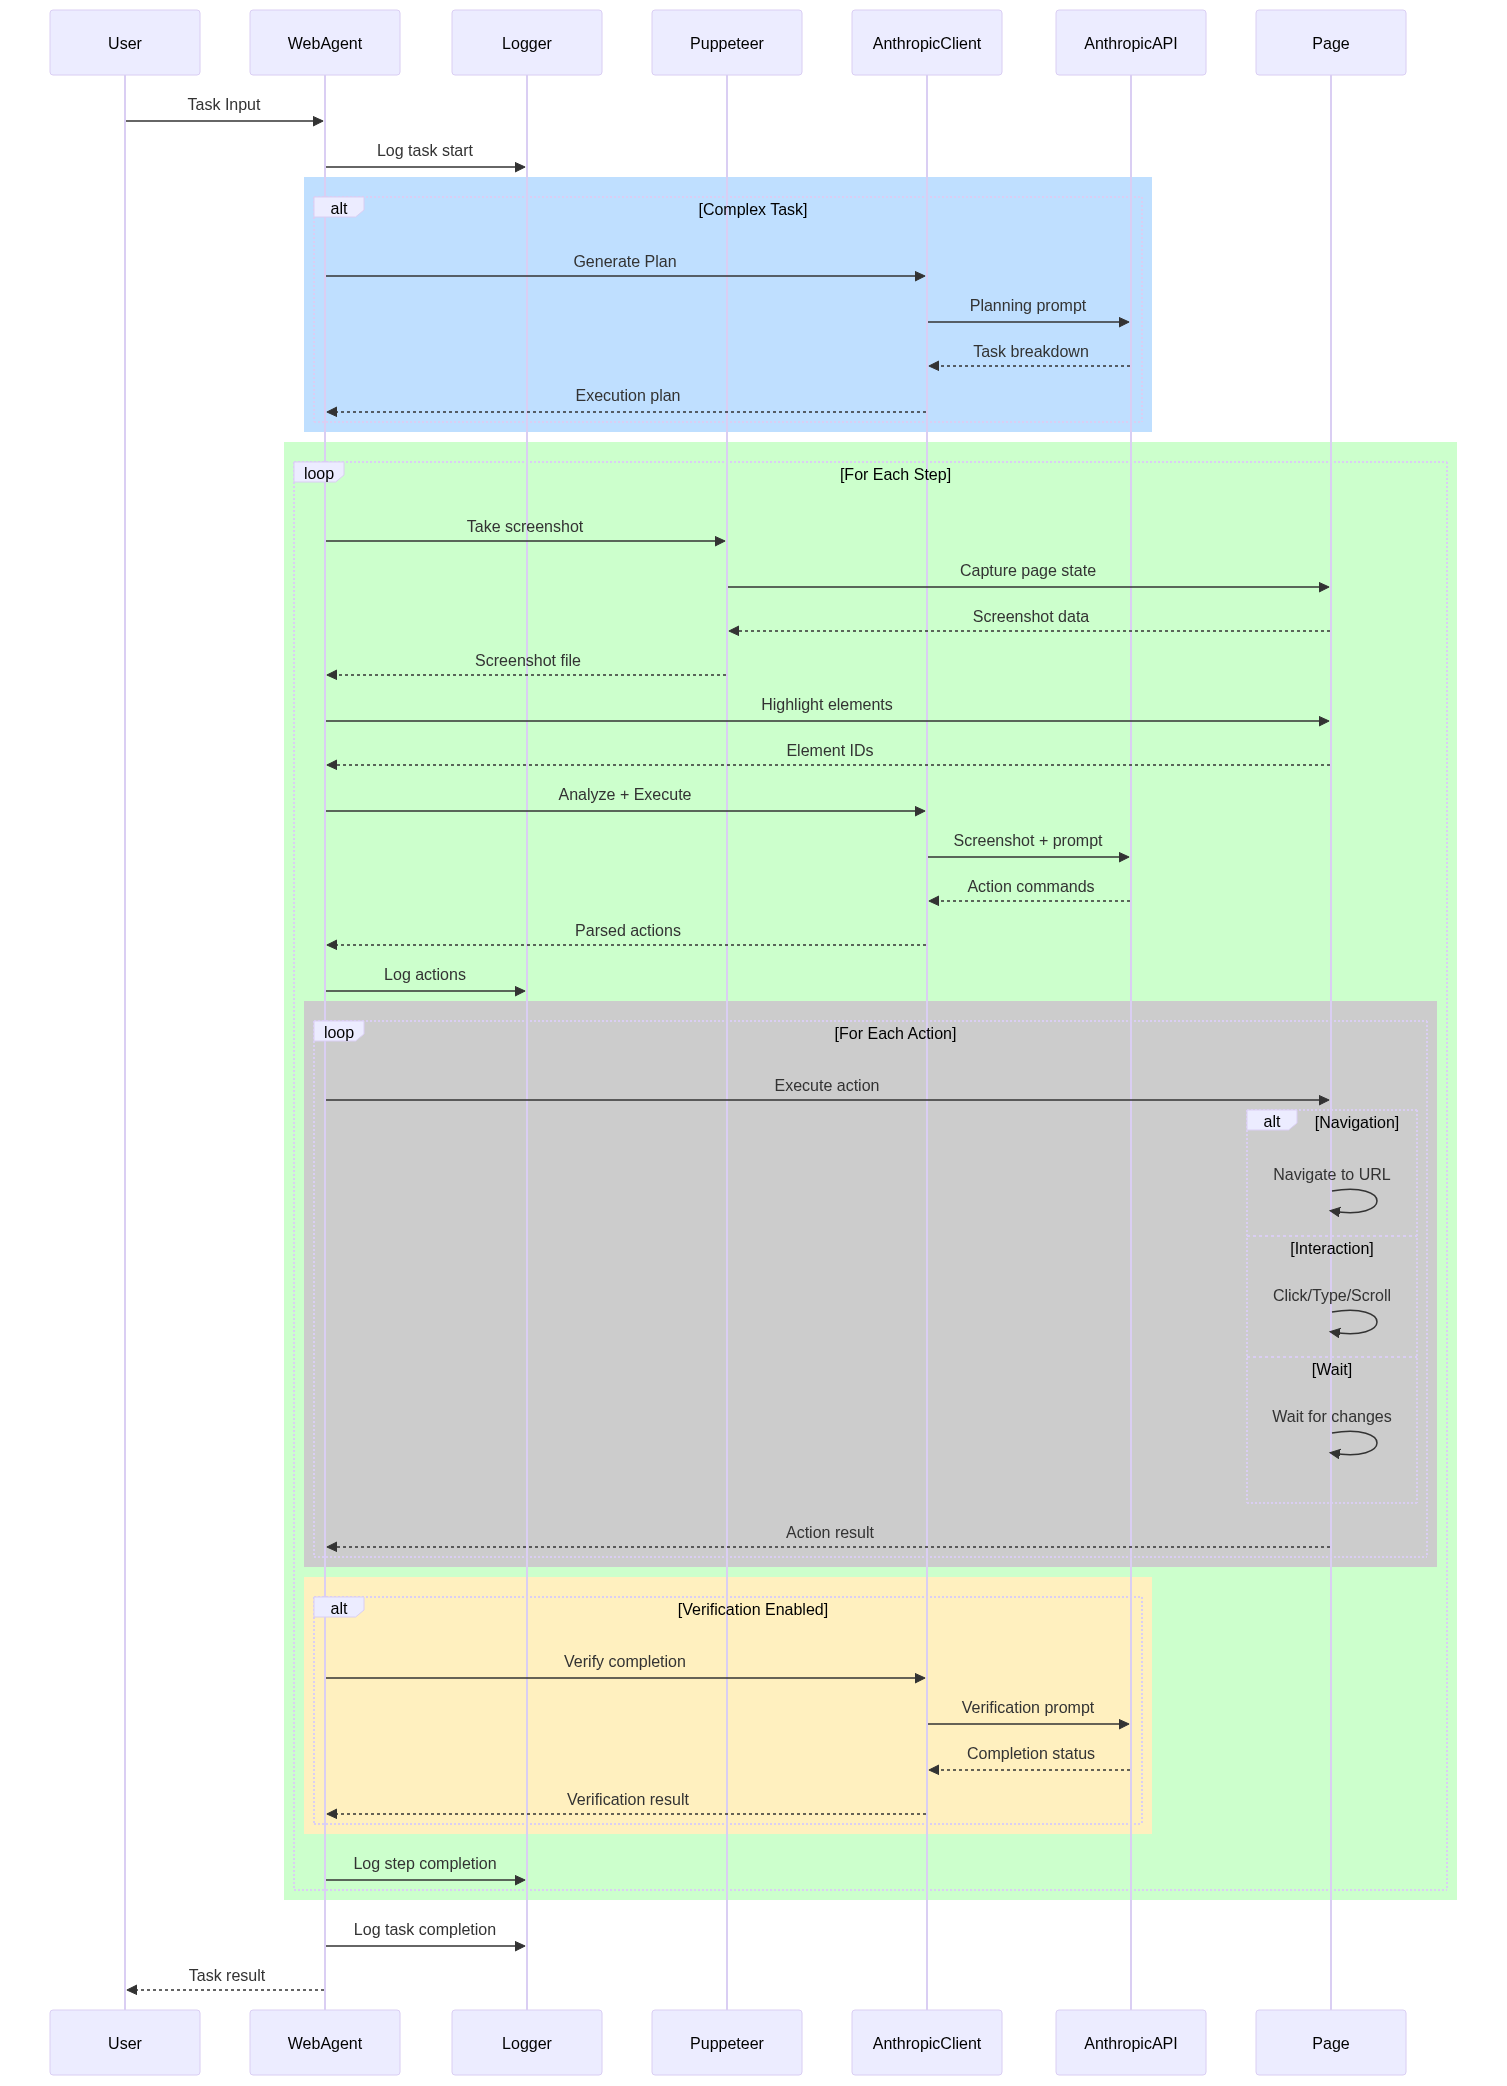
It consists of the following steps:
- 1 User prompts the web agent with a complex task
- 2 The web agent uses AI to analyze the task and generate a plan under a predefined prompt
- 3 Once the plan is generated, the original task is split into multiple steps
- 4 For each step
- 4.1 web agent uses Puppeteer to perform script to highlight each interactive elements and number them with circle on the page
- 4.2 web agent uses Puppeteer to take a screenshot of current page and let AI to analyze the page and generate one or more actions that agent is capable of performing
- 4.3 repeat 4.1 and 4.2 until all actions are generated and performed
- 5 repeat 4 until all steps are completed
- 6 Once all steps are completed, web agent will summarize the result with the cost of each step and the total cost
Here is a real example of a complex task I prompted the web agent with:
Go to https://npmjs.com and then jump into the "Pricing" tab, tell me what the pricing is for each category in Pricing page
Let's have a deep dive into how it is completed step by step.
3.1 System prompt
The system prompt is the most important part of the web agent. It defines how the web agent should behave and what it should do. The system prompt I used is as follows:
You are an AI web browsing agent capable of planning and executing complex multi-step tasks autonomously.

CAPABILITIES:
1. CLICK:[element_id] - Click on an element with the specified gbt_link_text attribute
2. TYPE:[element_id]:[text] - Type text into an input field
3. FETCH:[url] - Navigate to a new URL
4. SCROLL:[direction] - Scroll up or down (direction: up/down)
6. HOVER:[element_id] - Hover over an element to reveal menus or tooltips
7. PRESS:[key] - Press keyboard keys (Enter, Escape, Tab, etc.) or key combinations (Ctrl+A, Ctrl+C)
8. WAIT:[seconds] - Wait for a specified number of seconds for page changes
9. CLEAR:[element_id] - Clear the content of an input field
10. ANALYZE - Take a screenshot of the current page and extract specific information from the page as per the user's request
11. COMPLETE - Mark the current task as finished
12. PLAN:[task_description] - Create a step-by-step plan for a complex task

TASK EXECUTION MODES:
- SINGLE MODE: Execute one action based on user request
- AUTONOMOUS MODE: When given a complex task, create a plan and execute steps automatically

INSTRUCTIONS:
- When you see highlighted elements, they have yellow borders and numbers. Use these numbers as element_ids.
- For complex tasks (multiple steps), use PLAN: to break them down, then execute each step.
- Always explain what you see and what action you're taking.
- After each action, assess if you've completed the current step and what to do next.
- Use COMPLETE when the overall task is finished.

PLANNING FORMAT:
When creating a plan, use this format:
PLAN: [Brief task description]
STEPS:
1. [First step]
2. [Second step]
3. [Third step]
...

Then execute each step automatically.
It looks a bit informative, but it is actually quite simple if I break it down in this way:
CAPABILITIES
This is the foundation of the web agent. It defines what actions the web agent can perform on the web page. Each action is defined with a specific format which corresponds to the Puppeteer script that will be executed later.
TASK EXECUTION MODES
I need to clearly define what a complex task is and how the web agent should handle it. With this definition, the web agent will treat the prompt above as a complex task and will create a plan to execute it.
INSTRUCTIONS
This part is to guide the web agent on how to analyze the page and ensure the analysis results adheres to the format defined in the CAPABILITIES section.
PLANNING FORMAT
The web agent replies on a expected format of complex task planning to start with through transform the complex task into a series of steps in JavaScript. Without this, the web agent will not start the planning process at all.
3.2 Break down the complex task
The above system prompt is the basis of prompts in this web agent, it has established the foundation of how the web agent should behave and what it can do, making the next step of breaking down the complex task into multiple steps much easier.
There are many methods to determine whether a task is complex or not, but they are categorized into two types: Either identifying the conjunction keywords in the task description with regex or sing AI to analyze the task description and determine whether it is complex or not.
Once the original tasks is determined to be complex, the web agent will ask the AI with the following prompt to break it down into multiple steps:
This appears to be a multi-step task. Please create a detailed plan to accomplish this task autonomously. Use the PLAN format:

PLAN: [Brief description]
STEPS:
1. [First step]
2. [Second step]
3. [Third step]
...

Please ensure each step must be either a sub task or sub multiple-task that I'm able to complete given the capabilities of the agent and exactly follow the format specified above, do not deviate from the format.
Nothing fancy here emphasis on the format and the capabilities of the web agent, so that the AI can generate a plan with the expected format and the steps are executable by the web agent.
Real AI Response:
PLAN: Navigate to npm website, access pricing page, and analyze pricing information for all categories

STEPS:
1. Navigate to npm website
   - FETCH:https://npmjs.com

2. Find and click the Pricing tab
   - ANALYZE to locate the Pricing link and CLICK on the Pricing element

3. Wait for pricing page to load
   - WAIT:2

4. Analyze pricing information
   - ANALYZE to extract pricing details for all categories

5. Report findings
   - Compile and present pricing information for each category

This plan follows the available capabilities and will allow me to systematically gather the requested pricing information. Would you like me to proceed with executing this plan?
3.3 Generate actions for each step
The generated plan now can be transformed into a series of steps that the web agent can execute.
const steps = [
  'FETCH:https://npmjs.com', // step 1
  'ANALYZE to locate the Pricing link and CLICK on the Pricing element', // step 2
  'WAIT:2', // step 3
  'ANALYZE to extract pricing details for all categories', // step 4
  'Compile and present pricing information for each category', // step 5
]
The web agent will then execute each step one by one until all steps are completed.
3.4 Perform actions for each step
Obviously, the step 1 & step 3 are straightforward as they adhere to the format defined in the CAPABILITIES section, which can be executed directly by Puppeteer. The other steps, however, are required further analysis and breaking down into multiple sub tasks that can be executed by Puppeteer.
Let's take step 2 as an example to dig into how it is executed eventually.
Collect and highlight the interactive elements on the page
For any interactive elements on the page, the web agent will use Puppeteer to highlight them with yellow borders and number them with circles every time before an action is taken.
The following screenshot is captured when step 1 completed:
These elements are also be stored in a JavaScript list for later use, and each item is recorded with the necessary meta data such as the element ID, type, url and other attributes. Thus, the web agent exactly know element 3 represents the "Pricing" tab and what href it points to.
Ensure sub tasks are executable
"ANALYZE to locate the Pricing link and CLICK on the Pricing element" isn't an executable action, we need to leverage AI again to analyze where "Pricing link" is and which number it is via the dedicated prompt below:
Step 2/5, Analyzing the page for the current step with the following prompt:
Current task: Navigate to npm website, access pricing page, and analyze pricing information for all categories
Current step (2/5): Find and click the Pricing tab

- ANALYZE to locate the Pricing link and CLICK on the Pricing element

CRITICAL: Provide the action command(s) needed to complete this step. Use the exact format specified below.

ACTION FORMAT(Provide one or more action commands combined with semicolon):
CLICK:3
TYPE:1:John Smith
TYPE:2:john@example.com
TYPE:3:123 Main St
CLICK:4

REQUIRED ACTION FORMATS (copy these exact patterns):

- CLICK:3 (for clicking element with ID 3)
- TYPE:5:John Smith (for typing "John Smith" into element 5)
- FETCH:https://example.com (for navigating to a URL - NO brackets around URL)
- SCROLL:down (for scrolling down)
- SCROLL:up (for scrolling up)
- HOVER:4 (for hovering over element 4)
- PRESS:Enter (for pressing Enter key)
- PRESS:Ctrl+A (for pressing Ctrl+A combination)
- WAIT:3 (for waiting 3 seconds)
- CLEAR:2 (for clearing content in element 2)
- ANALYZE:what is the cheapest product on the page? (for analyzing the cheapest product on the page)

STEP ANALYSIS REQUIREMENTS:

1. If this step involves navigation/going to a URL → Use FETCH:URL_HERE (NO brackets!)
2. If this step involves clicking something → Use CLICK:element_id
3. If this step involves typing text → Use TYPE:element_id:text_to_type
4. If this step involves scrolling → Use SCROLL:direction
5. If this step involves hovering for menus → Use HOVER:element_id
6. If this step involves keyboard actions → Use PRESS:key_or_combination
7. If this step involves waiting for changes → Use WAIT:seconds
8. If this step involves clearing a field → Use CLEAR:element_id
9. If this step involves analyzing/extracting information → Use ANALYZE:analysis prompt

EXAMPLES:
✅ FETCH:https://docs.google.com/forms/example
✅ CLICK:7
✅ SCROLL:down
✅ ANALYZE:verify the submission is complete
✅ TYPE:1:John Doe
✅ TYPE:1:name;TYPE:2:email;United States;CLICK:4
✅ TYPE:1:name;TYPE:2:email;CLICK:3
✅ TYPE:1:name;TYPE:2:email;CLICK:3;SCROLL:down;TYPE:3:name;TYPE:4:email;CLICK:5

EXAMPLES OF WRONG FORMAT:
❌ FETCH:[https://example.com]
❌ CLICK:[7]
❌ "FETCH:https://example.com"
❌ SELECT:5:[United States]
❌ [TYPE:1:name, TYPE:2:email]
❌ The first sub step is CLICK:[7] and the second sub step is TYPE:[7]:[name]

EFFICIENCY RULE:
Only respond with "BREAKDOWN_NEEDED" if the step is genuinely complex and cannot be expressed as a sequence of actions as per my capabilities;
Only respond with "NULL" if there is no action to be taken or the action is outside of my capabilities;
Only respond with "ANALYZE" if user explicitly asks for analysis of the page;
This prompt double-emphasizes the format of the action commands and the requirements, and what's more important is that it also provides contrastive examples of correct and incorrect formats, further improving the accuracy of the AI response.
3.5 Perform actions for each sub task
The AI response from 3.4 will eventually be as follows:
CLICK:3
Now it becomes an executable action as same as the step 1 and step 3 above, web agent will first find out the JavaScript object of the element with ID 3 stored in the list, then use Puppeteer to click on it.
Same process will be repeated for the step of "ANALYZE to extract pricing details for all categories" above, it will be transformed into ANALYZE:extract pricing details for all categories, which points the analysis action provided by AI(before semicolon) with the prompt after semicolon.
3.6 Completion verification(Optional)
Sometimes AI might mistakenly suggest an element id that is not supposed to be clicked when the prompt is not clear enough or due to its model capabilities. When the action is performed on the incorrect element but without errors, the web agent can't identify this issue without a further verification step.
However, enabling this verification step will significantly increase the cost of the web agent. Instead I hope the web agent will need to take a screenshot of the page and let AI analyze it again when it encounters an error, not doing the verification every time.
4 Cost
The brief cost report of this demo test under claude-3-5-sonnet-20241022 model is:
| Metric | Value |
|---|---|
| Model | claude-3-5-sonnet-20241022 |
| Total API calls | 8 |
| Total input tokens | 36,818 |
| Total output tokens | 579 |
| Estimated Cost | $0.1191 (Input: $0.1105, Output: $0.0087) |
Apparently the cost is quite high. The main reason is that the web agent needs to use AI to analyze the screenshot every time and the prompt is not short either.
5 Vibe coding feedback
It is able to complete around 60–70% of a project from scratch, but often becomes less competent when it comes to finishing the rest, especially when you need it to smash an issue caused by architecture/system design
At the beginning, I relied entirely on AI-generated code without much oversight. This led to poor code quality, as I didn’t intervene early enough to steer the direction or enforce good practices.
I often acted as both the code reviewer and QA, which worked fine when I was already familiar with what the AI was generating. However, for the bugs found with unclear root causes—I felt overwhelmed. In some cases, I had to repeatedly raise issues with the AI, which still failed to resolve them after multiple attempts, ultimately breaking the code further.
Keep your AI prompts small and clear. A concise, well-scoped request leads to better responses and avoids confusion.
Establish a clear and readable project structure from the beginning. This makes debugging, reviewing, and prompting much easier later on.
Avoid asking the AI to refactor incomplete or work-in-progress (WIP) code. Let the initial development settle before requesting structural changes.
6 Summary
In this article, I have shared my journey of building a web agent through vibe coding. The architecture, system prompt, and the workflow of the web agent are explained in detail.
Speaking of the solution AI built, the biggest challenge I can identify is how to accurately locate the interactive elements that the web agent can perform actions on. Analyzing the screenshot of the page makes it much easier indeed but it is also the most expensive part of the solution, especially the page isn't fully visible on current screen, the web agent needs to scroll down many times to capture the whole page, which will increase the cost significantly and bring extra complexity of understanding the whole page context.
Besides, the task orchestration is totally based on the prompts, the AI responses can vary a lot depending on different models with the same prompt, this instability makes it hard to debug and maintain. Even it doesn't work when I'm writing this article with "claude-3-5-sonnet-20241022", which I had tested before and it worked well.
Therefore, I would only recommend this solution as a study purpose or a prototype, not for production use unless the token cost is not a concern and the model can consistently and back-compatibly handle the prompts.